How Do You Upload on Covered Ca
Covered California has quietly launched a new version of their eligibility certificate upload section on their application.
Covered California has updated the eligibility document upload section, which was 1 of the concluding vestiges of the original CalHEERS consumer interface. The new eligibility document upload screens align closer to the newer and simplified displays that consumers and agents use to enroll in health insurance through Covered California.
Over the last couple of years Covered California has been redesigning different parts of their online application to be less confusing to consumers. They have as well enhanced sections such as the income portion to assist guide consumers in selecting the right entries. The certificate upload section is one of the final sections to become a confront lift.
Eligibility Document Upload Section Quietly Launched
Usually Covered California makes an declaration nigh a new build to their CalHEERS program in an email to agents. This was not the case with the new eligibility certificate upload section. Regardless, the document upload section was very confusing to consumers, agents, and Covered California. The notice that a consumer had to upload a verification or proof of a status such equally clearing status was not e'er evident. There were times when consumers were told to submit a document but there was no identify on the consumer's account to make such an upload. Then there were questions as to whether anyone actually viewed the document and changed the enrollment from condition to enrolled status.
Manage Verification Gone
Earlier in the year Covered California changed the application to allow people to upload a certificate even if in that location was no pending request. The link Manage Verifications, which is another term for upload requested eligibility documents, was not always present on the consumer's account.
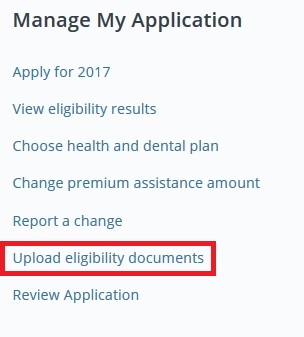
On your Covered California account home page curlicue downwardly to the Manage My Application section and select Upload eligibility documents.
With the final enrollment I did I noticed the Manage Verification link was gone but a new link under Manage My Account was agile. Information technology was chosen Upload eligibility documents, a far more explanative term for consumer. Notwithstanding, it nevertheless was not readily apparent that the consumer had to upload documents after we had selected a health plan for the family unit.
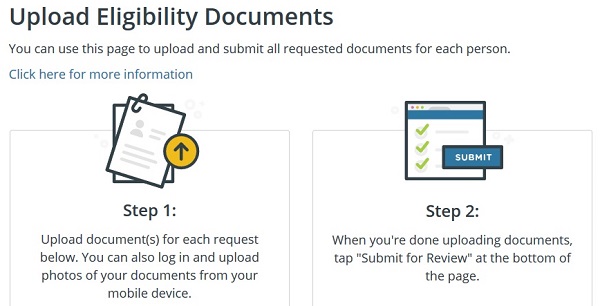
Y'all'll be greeted with another window outlining the steps of the process.
Clicking on Upload eligibility documents brings upwards another window explaining the two-step process.
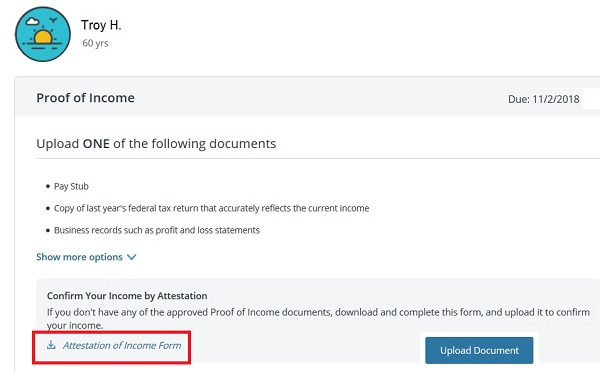
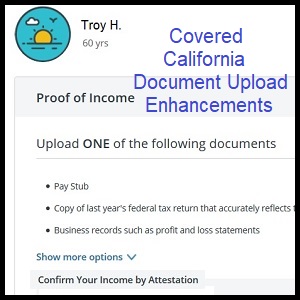
The system automatically displays the type of verification Covered California is looking for such as Proof of Income. Click on Upload Document to proceed.
The adjacent screen shows the type of verification being requested. In this case it was for proof of income. It clearly shows the due date for the verification. Another nice addition is a link to the income attestation course. For 1099 self-employed individuals with fluctuating income the attestation class allows them to state their expected annual income. The attestation course has taken the place of an affirmation that many people submitted, sometimes in hard to read mitt written descriptions and notarized. This had to exist a nightmare for Covered California.

This window allows you to select the specific type of acceptable documents for the verification Covered California is requesting. Click the circumvolve adjacent to the type of file you are uploading.
If the consumer has one of several documents to verify the asking they can click on upload certificate. Another screen is so displayed that allows the consumer to select which blazon of certificate they are uploading. They can then verify the correct document in the Documents and Correspondence section of the application reach by clicking on View Past Application on their domicile page.
Optical Character Recognition
Last year I was contacted by a company that was submitting a proposal to Covered California to create a new eligibility document upload department to supplant the existing cumbersome build. I gave them my thoughts on what Covered California was looking for and how to brand information technology easier for the consumer. I heard they received the contract, merely I was non involved in whatever subsequent consultation. However, one of the unique aspects that were being offered was an optical grapheme recognition (OCR) relative to many standard government forms. For instance, if someone were to upload their last 1040 federal revenue enhancement render, the programme would recognize the numbers in the unlike fields. The goal was to have machine intelligence verify the document as opposed to having humans wade through thousands of documents each day. OCR is already being used at the federal level with some agencies that handle the verification of uploaded consumer documents.
I don't know if the latest build of the eligibility document upload section has OCR built into it or not. Maybe Covered California volition clue united states of america in that feature in the future. Either fashion, information technology's overnice that Covered California has upgraded the document upload department. My adjacent suggestion to Covered California is to include a real time alerts or notification section on the consumer's home page.
Currently, when I log into a customer's Covered California account there are no alerts that some action needs to exist taken such every bit submitting documents. There could likewise exist alerts that a dependent is aging off of the plan or that a family member who is near the age of 65 and eligible for Medicare. I'm sure if Covered California survives the age of Trump and the continued assaults on the ACA that those enhancements will somewhen exist added.
How To Upload Documents, Covered California
The following guide from Covered California was released before the latest eligibility document upload build was added to the awarding, just it is withal relevant if the Upload eligibility document link is not active.
http://itslifecare.coveredca.com/how-to-upload-documents
If you received a notice asking you to submit further documentation — for example, documents related to your household, your income or your lawful presence condition — you may submit documents to Covered California through your online business relationship using these piece of cake steps.
NOTE: Check THIS list to make sure y'all are submitting the right certificate. (If yous've received a request for documentation regarding your incarceration condition, you may submit an attestation form.)
To submit documents to Covered California online:
- Scan or take a photo of the document you desire to upload. Save it to your computer.
- Log on to your business relationship at CoveredCA.com
- Click on the "View By Application" link located on the right of the home folio, below "More Actions."
- If this option is not available on the home folio, you may call the Covered California Service Eye to confirm whether or not y'all need to submit documents.
- Click "Documents & Correspondence."
- Select the "Upload New Certificate" link in the green box.
- Select "Upload Document."
- Select the "Document Type" in the drib down menu.
- Notation: Not all accepted certificate types are located in this drop down. If you practise non see your document blazon, delight select the most like.
- Click the "Browse" button to detect the certificate that yous want to upload from your calculator.
- Click "Upload."
- To confirm that your document uploaded, look for the text in calorie-free green that says, "File uploaded successfully." NOTE: If you become a "File type not supported" mistake message, you may need to change the file extension from all capital letters, such as JPG, to lower case messages like jpg.
- Select "Shut" to become back to the "Uploaded Document" page.
- You tin click the "View" option to be sure you uploaded the right document.
- The "Dorsum" button will return yous to the "Submit Verification" page to repeat the process for any other any other requested documents.
- In one case you have uploaded documents you will go to the bottom of the folio and select the "Submit" push button. You will receive a verification ID as a reference number.
- You volition now be taken back to the dwelling page.
Source: https://insuremekevin.com/new-covered-california-eligibility-document-upload-section/
0 Response to "How Do You Upload on Covered Ca"
Post a Comment